California Miniature
Schnauzer Rescue
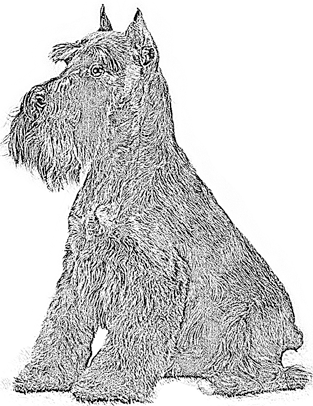
Schnauzer Grooming
The Miniature Schnauzer is a double-coated breed that has a wiry topcoat and a soft undercoat. The wiry topcoat, which is required for the show ring, is maintained by hand stripping. The pet trim calls for the same outline but it is maintained using electric clippers. The wiry topcoat will become soft with clippering, but clippering is easier, less expensive to have done, and easier on the dog.
AMSC Trimming Chart
The AMSC Trimming Chart is helpful both to those who want to learn to groom their Schnauzer themselves and to give to a professional groomer who is skilled, but not very familiar with how a Schnauzer should be trimmed to look its best.
Click on the chart for a larger version that will print well on 8½ x 11 paper, landscape layout. You can laminate it in clear plastic if you wish to use the chart on an ongoing basis.

The Chart is copyrighted by the AMSC, which makes it available to owners and groomers of Miniature Schnauzers as a public service. The AMSC allows you to print as many paper copies as you wish, and to distribute paper copies to others, so long as (1) you do not charge for the copies, and (3) you do not remove or alter this notice regarding the AMSC’s ownership and copyright and the limited rights the AMSC is granting. The AMSC does not allow anyone other than affiliated Miniature Schnauzer clubs to copy its chart to other web pages, but you may link to the chart and associated information on the AMSC's site, at http://amsc.us/index.php?option=com_content&task=view&id=16&Itemid=33
For more detailed instructions and charts including hand stripping patterns, order the “Miniature Schnauzer Grooming Charts” from the AMSC Store page of AMSC's website.
Tools
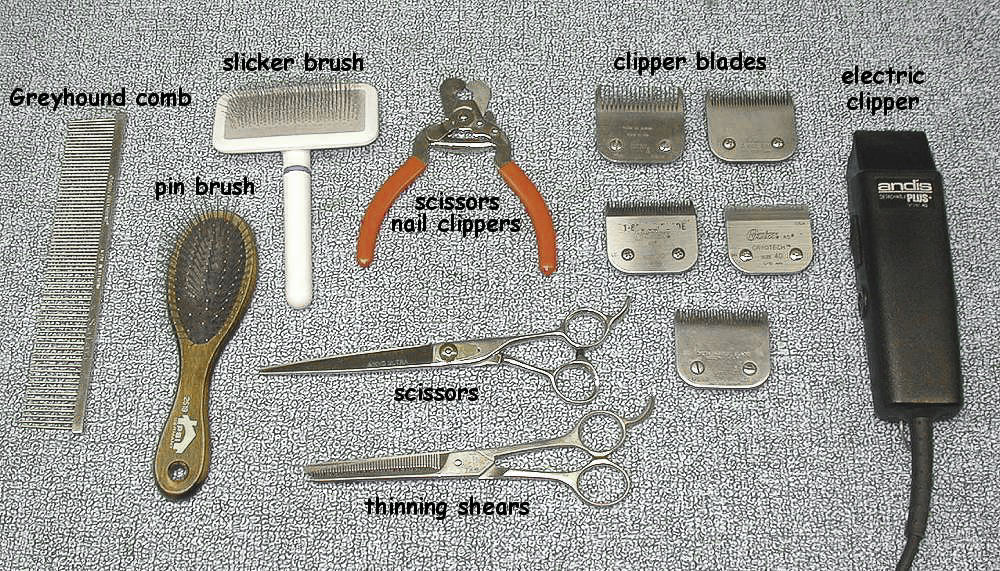 (Photo copied from the AMSC website)
Here are some basic tools you will need before you get started. Mail order catalogs that specialize in dog show or dog grooming equipment are usually the best source of quality grooming equipment.
Combs
The most commonly used comb is the Greyhound brand/style. It comes with ½ finely spaced teeth and ½ medium spaced teeth and thus is very versatile. Some people find shorter combs with handles easier to use.
Brushes
Most groomers/exhibitors have a collection of Pin brushes and Slicker brushes. Pin brushes have straight metal pins in a cushioned backing, often with small plastic balls at the pin tips to avoid scratching. These are used for dogs with thinner furnishings or a first brush-through of the furnishings. Slicker brushes have shorter metal pins that usually are bent at the ends. They have more pins and thus give a more thorough brushing. This is especially useful for fuller furnishings. Many people prefer “soft” slickers with pins that are more flexible than the pins on regular slickers.
Nail Clippers
There are a few types of nail clippers. One is a “guillotine” style and another is a scissors type. It is a good idea to keep styptic powder on hand in case the nail quick is nicked and bleeds.
Scissors
A sharp pair of scissors is essential when trying to do a professional job. When dull, scissors tend to fold the hair rather than cut it. Don't skimp on quality when buying scissors. Poor quality scissors will not hold their edges and will become dull fairly quickly.
Thinning Shears
Thinning shears allow the groomer to blend between the clippered and scissored areas or the clippered and stripped areas. The most common style has one solid blade and one blade notched with 42 to 46 teeth.
Electric Clippers
There are many types, styles and price levels of electric clippers. The Oster A5 or the Andis AG are the most commonly used brands and models. (Both the A5 and the AG come in single speed and 2-speed, and turbo single speed and 2-speed models. Any of those will suffice.) Both have detachable blades, and the blades from either brand will fit the other. The blade number indicates the closeness of the cut—the higher the number, the closer the cut. You will need at least a #10 and a #30. Additional useful sizes are #40 (used on the ears), #7F (used instead of a #10 on the body of dogs that have thin coats) and a #15 (used instead of a #30 on dogs with sensitive skin that tend to get razor burns if clipped too closely).
Make sure to use clipper oil on the mechanics of the blades before you use them. Keeping them well oiled will help prevent the blade from getting hot. Clean the blades and re-oil them after a grooming session before you put them away.
Grooming Table
A grooming table, arm and noose are invaluable grooming aids. They help to keep the dog steady and in one place while grooming. The arm attaches to the table and the noose hangs from the arm. The arm should be set at a comfortable height for the dog . The dog’s head is secured through the noose like a collar. These can be purchased through dog grooming supply houses. A home made one will do if you are handy or know anyone that is handy. The most important factors to consider when making your own is to have a non-skid top, sturdiness and for the height of the table to be comfortable for the groomer. The dog needs to be taught to stand up and stand still while he’s being groomed. This requires patience and time. Teaching your dog stand/stay is invaluable. The dog will eventually learn that it is to stand still while being groomed. It makes it faster and less stressful on the dog and the groomer if the dog is standing still. Even if you use a professional groomer, they will be grateful to have a dog that stands still on the table. So all Miniature Schnauzers should be taught from a young age to stand still on the table.
Grooming and Care Instructions
Brushing
Brush out the dog before bathing or clipping to remove any matts in the furnishings because matts become larger when wet. Brush the beard, legs and underskirt to make sure there are no knots using a slicker brush. Brush upward (against the natural lay of the hair) starting at the top of the leg and work down the leg as you are brushing. This procedure will help ensure that the furnishings are brushed out in their entirety. After brushing you should comb through the furnishing to make sure all the knots are out.
Don’t forget underarms and in between the toes. These are places where knots are commonly found. Dogs with thicker furnishings will require more brushing and maintaining than those with sparser hair. It is best to brush the furnishings and beard at least weekly to keep matts from forming. If a matt or a knot is found, place your free hand between the matt and the skin prior to combing. This helps to minimize the discomfort to the dog by reducing the pulling on the skin.
Trimming nails
Be careful not to cut nails too short or they will bleed. Using nail clippers, cut little slivers until you see a dark circle appearing in the center of the nail. This is the edge of the quick or blood vessel inside the toenail.
Alternatively, you can grind nails with an electric grinder. Dremel makes grinders for hobby use and Oster markets an identical unit to the pet trade. Both use sandpaper cylinders that slide over a metal barrel on the end of the tool. Both come in battery and plug-in models. The battery-operated model grinds more slowly and is thus easier to use. Trim the hair on the foot before grinding and be careful when using any of the grinders because the hair can be caught on the spinning tool shaft if you are not careful.
Bathing
A Miniature Schnauzer should be bathed as often as necessary. It will depend on how dirty he gets. The temperature of the water should be warm and not too hot. Be careful not to get water and shampoo in the ears, eyes and mouth when bathing the dog. You can put cotton balls in the dogs ears to help prevent water from getting in the ear canal. To rinse the beard, point the sprayer away from the dogs head and direct the stream down the beard. When wetting the top of the head, lift the head up and direct the spray towards the back of the dog. To wet the belly, lift the dog up by the front legs and let him put his weight on the rear legs.
Any good quality shampoo will work, whether sold for dogs or for humans. Dilute the shampoo with water according to the label. If diluting is not mentioned, it is still recommended to dilute at least 1 to 3. Give the dog a thorough rinsing after the shampoo is applied. Traces of shampoo left behind can cause dry and flaky skin. When applying the shampoo to the beard and furnishings, use a squeezing motion. Rubbing the shampoo into the legs can cause tangles.
Drying
When towel drying the legs and beard, use the towel to squeeze out the excess water. Avoid rubbing to help prevent tangling the furnishings. To have both hands free while using an electric dryer, stick the dryer through something tied around your waist.
The secret to fluffy and straight leg furnishings is to make sure that the leg furnishings are blown out straight and completely dry. Brush the beard and eyebrows down. Brush the legs up. Start with a pin brush and change to a slicker brush only when the leg is almost dry because slicker brushes tend to rip out hair when used on a wet leg.
Clipping
The blade used on the body depends on the coat texture and thickness. Fortunately, the various clipper and blade makers use consistent designations for blades. Keep your clipper blades well oiled. This prevents them from getting too hot.
For thinner coated dogs, a #7F blade should be used. For most dogs, use a #10 blade is used, cutting with the grain of the hair. A #10 blade against the grain will give an even closer cut, and this works best for dogs that have thick or fluffy coats. Hold the clipper with the flat part of the blade against the skin. Make smooth strokes, and even hold the skin a little taught, in order to help prevent skin irritation and clipper burn.
Start by clipping down the back of the neck from the base of the skull. Go down the back and along the sides of the body. Be careful not to go too far down into the elbow—stop about 2 fingers above the elbow. Follow this line along the sides of the body also. Blend the clipped body hair into the underbody furnishings by using the blade turned the opposite way than normal.
Clip down the side of the rear legs while folding the leg furnishings in your other hand to prevent cutting off the furnishings.
Clip the front down to the start of the front leg, usually where the white bow tie is on a Salt and Pepper or Black and Silver Schnauzer. Clip against the grain of the hair on the throat and side of the head to make it a bit shorter than the body hair.
Clip the top of the head use the #10 blade with the grain. Using a #30 blade, clip the rear and the underside of the tail going against the grain. Next, lift the dog's front feet, holding both front feet with one hand, and clip the belly with the #30 blade being very careful around the genital area. A #40 blade is used on the ears, going with the grain on the outside and against the grain on the inside. Use tweezers or hemostats to pull the hair on the inside of the ears. Pull carefully to avoid irritating the inside of the ear.
Legs
Remove hair from the pads of the feet by either scissoring or clippering using a #40 blade. Comb the hair down at the base of the foot and trim a circle around the foot. Comb the hair on the front leg so it stands out. With scissors pointing straight down, carefully trim in a circular manner to achieve the desired column effect. Keep fluffing with the comb and scissoring until you get the desired length.
Comb the chest hair out and with scissors pointed downward, trim it even with the chest. The underbelly should be trimmed so that it gently tapers upwards toward the back legs.
For the rear legs, comb down the hair at the base of the foot and trim around the foot. Carefully trim the hair on the stifle to blend with the hock, following the contour of the leg. Blend the rear furnishings by extending the line of the underbelly and curve at the start of the rear leg into the furnishings. (Look at the chart above. Do not leave the furnishings high up on the side like a Scottish Terrier is trimmed.) Inside the rear legs, comb the hair out and trim down making the shape of an A or upside-down V with the hair at the top of the A being longer than the base of the foot. Then also comb out and trim with the scissors facing up at a slight angle to get a straight line.
Head
The head should be trimmed to appear rectangular in shape. Hold the dog’s head straight and then comb the eyebrows forward. With the scissors held vertically, trim the outer edge of the eyebrow in line with the widest part of the skull. Next, comb the eyebrows forward again. Place the scissors against the side of the head, just behind the corner of the eye. Point the blade tips toward the center of the nose. Make one smooth, straight cut. Try not to chop. To keep the eyebrow hair in place while cutting, you can wet the eyebrow, use styling gel or hair spray.
Using the scissors, cut a V shape in between the eyebrows where the skull joins the nose.
To trim the beard, start by combing it forward and trim a line from the widest part of the skull. This will help to achieve the correct rectangular appearance. When scissoring the side of the beard, hold the scissors parallel to the side of the head and don’t point them in towards the beard. Don’t cut away the top part of the beard or mask and be careful not to cut any hair under the eyes or a hollowed out expression will result. Do not shave down the nose. This takes off the top layer of the beard, which results in a hollowed out owl-like expression.
Rescue Dogs—No. Cal. |
Rescue Dogs—So. Cal. |
Sponsor or Adopt a Special Needs Dog |
Adopted | Tributes | In Memoriam |
Breed Information | Taking Your New Dog Home |
Health |
Publications | Links | Legislation |